Heterogeneous Compilation
与 CUDA Compilation 不同在于
The tools used in the CUDA compilation are all closed source except gcc, g++ etc., for example fatbinary and nvlink. We need to substitue these tools to tools in clang system.
- Clang Offload Bundler is used to combined different code for different machine structurel.
- Clang Offload Packager is used to embed device code into host code.
- Clang Linker Wrapper is used to .
这里面最复杂的感觉是怎么处理链接关系,如果仅仅说代码嵌入,从 CUDA 的流程来看,在 cudafe1.cpp include stub.c 生成 .o 这一步中 host code 中就已经包含了 device code,如果仅仅说 embed 的话,这显然就已经完成了,但是为何 CUDA 还进行后续那么多步骤,因为这一步生成的 .o 显然是无法运行的,device code 都还只是一个 extern signal,还需要同 CUDA runtime library 进行链接,这个过程该怎么进行比较难想。
但是链接的难点是,目前程序中的 device code 二进制的 fatbinary,同 CUDA runtime library 之间的链接该如何完成
目标分析
分析的核心目的是:学习现有异构程序编译链接生成 host end 单可执行文件的方法,将流程迁移到图计算机上实现异构编译。现有的场景基础是,已经生成了 device ELF object,后续需要由此生成带额外信息的结构化数据,然后嵌入到 host object 中,经过链接器链接 runtime library,生成 host end 可执行文件。
从 CUDA 编译流程看异构编译1
因为目前没有其他 device,只能拿 gpu 的进行。关键在于分析打包的格式,打包后的数据嵌入流程,以及在这种嵌入方式下,链接工作和嵌入后文件结构之间的关联。
cubin 和 fatbinary 的区别在于,前者是打包后生成的普通二进制文件,虽然打包遵循了一定格式,但这种格式通过 file 是无法获知的,显示的仅仅是 data;后者也是二进制文件,但是其遵循的是 ELF 文件格式。
CUDA的编译流程是:
- .cu -> .s (clang 生成 ptx)
| |
- .s -> .cubin (ptxas汇编器由 ptx 生成 ELF 格式的 cubin)
| |
- .s + .cubin -> .fatbin (fatbinary 将 ptx 和 对应的 ELF 打包为 offload binary)
| |
上述
简单来看,clang-offload-packager 或者 fatbinary 就是在原有的 ELF 数据基础上添加了部分额外信息然后封装为了特定的结构化数据,然后将此数据装填到 host object 中。
至于为什么一定要经过这样一个打包的步骤,按照目前理解,可能目的是为 device object 添加额外信息后,后续的处理程序便于定位 device object 中不同部分的数据(正确的理解视角应当是 device object 中包含多种类型的数据,直接装载多种 device object 的 ELF 数据到 host object 中后续过程无法定位要所需要的数据,所以为不同数据添加上相关信息再嵌入到 host object 中)。也就是说,所谓的打包更准确的说法是封装,因为打包一般说的是多个文件合并为一个文件,但是目前是可以对一个单独的文件应用 clang-offload-packager的,同样会在它原有数据的之前添加部分信息,所以说封装更准确一些。
那么这样一个过程是不是必须进行的?按照我的理解这一步并不是代码嵌入前必须进行的操作,嵌入什么格式数据不重要,重要的是 linker 要能够正确解析出这部分数据从而完成后续的链接工作,也就是说数据格式更像是一个接口规范,遵循这个规范可以更好的协调不同阶段的工作。
对于上述内容的证明,可见 llvm-project/llvm/include/llvm/Object/OffloadBinary.h 中的下述注释:
| |
- .fatbin -> .o (clang 将 offload binary 嵌入 host object,形成 ELF 格式的 .o fatbinary)
| |
- .o -> executable file (ld 对 fatbinary 完成链接工作)
| |
不知道是不是所有场景都可以简单通过 ld 实现链接工作,在图计算场景下是否还需要自行实现链接器,还是说链接规则都是通用的,只要其他步骤中的输出结构遵循 ELF 格式就可以完成链接?
经过实际测试,对于 CUDA 编译流程,将其中的 fatbinary 替换为 clang-offload-packager 是可以正常完成嵌入的,这也并不难理解,因为嵌入就只是简单地把 fatbin 添加到 ELF 结构中的 nv_fatbin section 中。但是嵌入之后的文件能否正常链接成可执行文件就是另一回事情了,因为目前 llvm 的 ld 的实现只能处理 fatbinary 生成的 fatbin, 无法处理 clang-offload-packager 生成的 fatbin,二者在 header 上是有差别的,按照我的理解,linker 无法处理后者。
虽然链接过程无法得到预期结果,但是这并不会影响 host 部分的执行(当前,前提是 device 部分链接失败不会影响到 host 的执行,例如以下带有宏判断的程序),因为链接无法完成,无非是嵌在 host object 中的nv_fatbin 等同于一段无效数据,不用这个 section 的内容就是了。
对于现有工具的理解
无论有哪些工具,所需要做的核心工作就三点:
- 生成类 fatbinary(关于 fatbinary 这个词的理解似乎不同场景有所不同,有些认为是 device code 相关内容的结合结果是 fatbinary,有些认为是 device object 嵌入 host object 之后的结果是 fatbinary,但是 wikipedia 给出的 fatbinary 这个概念本身对应后者,这里暂时不纠结用词,理解这个意思即可)
- 代码嵌入
- 链接
Prerequisite explanation: the following content references to the [Clang] Introduce clang-offload-packager tool to bundle device files
现在的工具情况是:
clang-offload-packager
clang-offload-packager实现的作用类似与 CUDA 的 fatbinary 工具类似,it creates a binary that can then be embedded into the host.clang-offload-bundler
The clang-offload-bundler is to embed device files into the host. Now the tool chain does this directly in clang by creating a global string in the LLVM-IR of the host rather than calling this tool. But HIP toolchain still uses the clang-offload-bundler.
clang-offload-bundler 似乎还有一些特殊的用途:
There is still functionality that the clang-offload-bundler provides that I don’t intend to replace, namely the bundling and un-bundling of text files.
clang-offload-bundler 似乎还有一个问题:
I don’t think we want to stick with the clang-offload-bundler approach, because the files that the –clang-offload-bundler spat out weren’t valid input to the rest of LLVM, e.g. clang -S -emit-llvm –offload-arch=gfx908 foo.hip -o - | opt would break.
clang-offload-bundler 的作用似乎比较混乱,按照目前理解它应当是既具备生成类 fatbinary 的作用,同时也具备代码嵌入的作用(这个从 --help 信息中无法验证,还需要实际测试一下)。LLVM-project 可能是为了实现功能细化,单独创造了一个clang-offload-packager工具用于生成类 fatbinary,同时因为上述提到的 bundler 作为一个独立工具所具备的问题,因此把代码嵌入的工具集成到 clang 中来实现。当然这只是预期的效果,如以下内容所示目前有一个问题就是在 HIP toolchain 中,仍然使用着 clang-offload-bundler 生成类 fatbinary 的功能,如果想要实现 bundler 和 HIP toolchain 之间的解耦,需要修改 HIP runtime,这并不是段时间内能够解决的问题,所以这些工具目前仍然保留了下来。
For HIP toolchain, clang-offload-bundler is also used to generate fatbinary files which can be loaded dynamically at run time through module API’s. So far I don’t think this can be replaced by clang-offload-packager in a short time, since it needs HIP runtime change.
所以按照我的理解,packager 可以看为 bundler 的一个子集,最终期望实现的工具结合方式应该就是 clang-offload-packager + clang. 前者负责 device object 打包,后者负责将 device object 嵌入 host object.
- clang-linker-wrapper (由clang-offload-wrapper合并而来)
clang-offload-packager
源代码位于 llvm-project/clang/tools/clang-offload-packager/ClangOffloadPackager.cpp
源代码中涉及到一个数据类型 OffloadBinary
文档中给出这样一句话:
We use this format to embed the offloading image into the host executable so it can be extracted and used by the linker.
也就是说假设我们希望向 clang 中添加对于其他数据的支持,核心依据只是要和 linker 的工作对应即可,让 linker 能够正确解析出来数据从而完成链接工作。
data format analyse
clang-offload-packager 打包数据的合并并不同于 fatbinary, fatbinary 采用的是一个二级表,最外层存在一个表头,外层表中间包含着子 section,每个 section 都各有自己的 header。clang-offload-packager 采用的是一级表,则是每个子 section 都有自己的 header2,最外层并没有再套一层 header。 clang-offload-packager 的设计思路是每个 offloading images 都有自己的 header,直接通过此 header 中的部分字段可定位到 header 对应的 image,在这种情况下,packager 把 multiple offloading images 打包为一个文件的方式就是简单连接3,通过测试确实可以验证这一点。
- According to the Offloading Binary Header - magic field to identify one offloading binary.
- According to the Offloading Binary Header - size field to take a slice of the binary blob containing the information for a single offloading image.
- According to the Offloading Binary Header - entry_offset field to find the actual offloading entries containing the image and metadata.
TODO: 增加利用简单示例理解 clang-offload-packager 生成的 offload binary 结构
uint64_t size Size of this binary in bytes 的含义是当前所有数据的大小
linking analyse
We can reference this article.
异构编译实例 - CUDA Compilation
Compilation process analysis
涉及到两部分内容,一部分是cuda面对编译问题时的设计架构,另一方面是cuda实际的编译流程
首先对CUDA程序的编译流程进行简要介绍,下图是NVIDIA CUDA Compiler Driver NVCC - The CUDA Compilation Trajectory中给出的cuda编译流程。
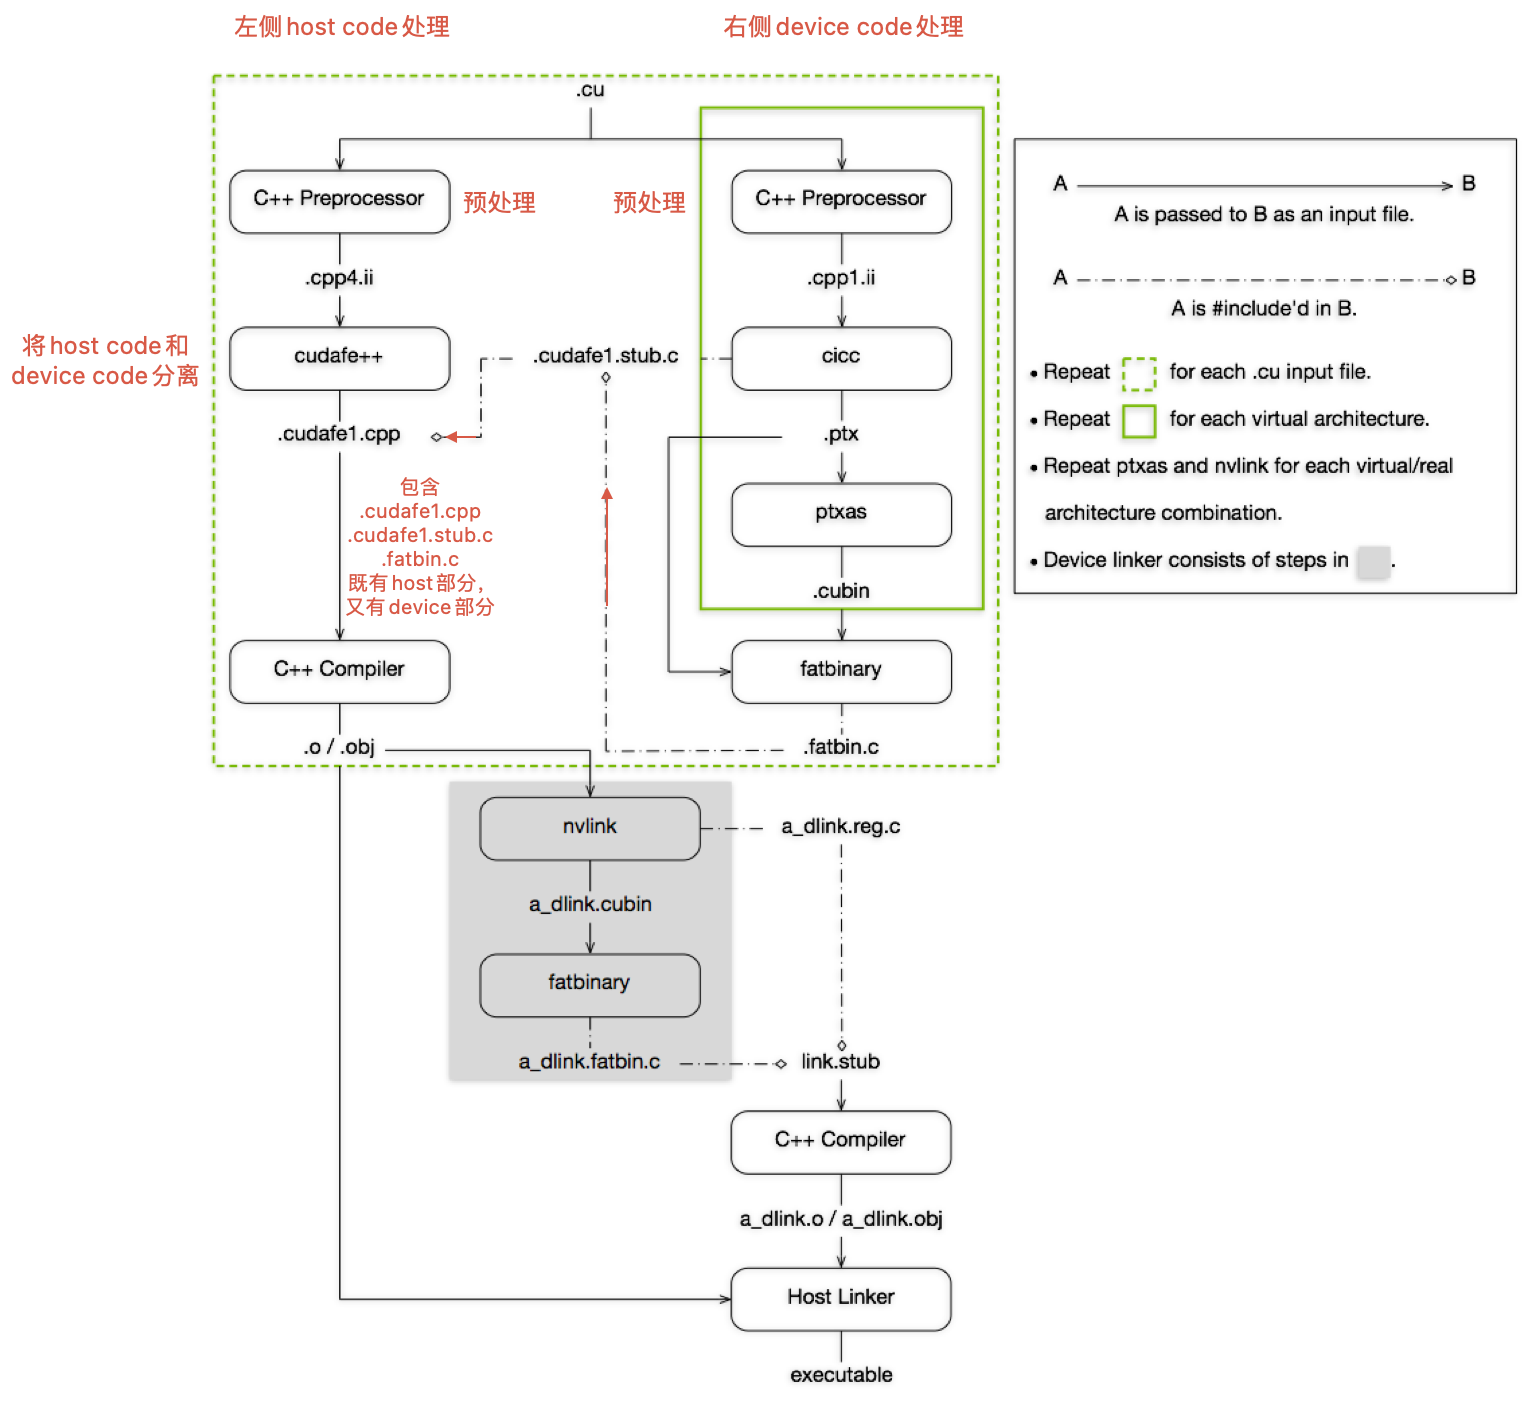
上图可以结合实际流程和用到的指令来理解,这些可以通过nvcc -dryrun <cuda program name>来获取到
-dryrun: List the compilation sub-commands without executing them.
生成的中间文件,可以通过nvcc -keep来获取到
-keep: Keep all intermediate files that are generated during internal compilation steps.
Now, we will analyse the detail progress of nvcc compilation:
- 删除生成的注册链接文件(如果存在):
rm main_dlink.reg.c
这一步确保之前生成的文件不会干扰当前的编译过程
- 预处理CUDA文件生成中间文件
生成 main.cpp4.ii
gcc -D__CUDA_ARCH_LIST__=520 -E -x c++ -D__CUDACC__ -D__NVCC__ "-I/home/jiaheng/dev/cuda-12.1/bin/../targets/x86_64-linux/include" -D__CUDACC_VER_MAJOR__=12 -D__CUDACC_VER_MINOR__=1 -D__CUDACC_VER_BUILD__=105 -D__CUDA_API_VER_MAJOR__=12 -D__CUDA_API_VER_MINOR__=1 -D__NVCC_DIAG_PRAGMA_SUPPORT__=1 -include "cuda_runtime.h" -m64 "main.cu" -o "main.cpp4.ii"
- CUDA前端编译器处理预处理文件
cudafe++ --c++14 --gnu_version=90400 --display_error_number --orig_src_file_name "main.cu" --orig_src_path_name "/home/jiaheng/gaohy/nvcc-simulate/main.cu" --allow_managed --m64 --parse_templates --gen_c_file_name "main.cudafe1.cpp" --stub_file_name "main.cudafe1.stub.c" --gen_module_id_file --module_id_file_name "main.module_id" "main.cpp4.ii"
- 预处理生成CUDA代码中间文件
生成 main.cpp1.ii
gcc -D__CUDA_ARCH__=520 -D__CUDA_ARCH_LIST__=520 -E -x c++ -DCUDA_DOUBLE_MATH_FUNCTIONS -D__CUDACC__ -D__NVCC__ "-I/home/jiaheng/dev/cuda-12.1/bin/../targets/x86_64-linux/include" -D__CUDACC_VER_MAJOR__=12 -D__CUDACC_VER_MINOR__=1 -D__CUDACC_VER_BUILD__=105 -D__CUDA_API_VER_MAJOR__=12 -D__CUDA_API_VER_MINOR__=1 -D__NVCC_DIAG_PRAGMA_SUPPORT__=1 -include "cuda_runtime.h" -m64 "main.cu" -o "main.cpp1.ii"
- CUDA编译器生成PTX代码
生成 main.ptx
cicc --c++14 --gnu_version=90400 --display_error_number --orig_src_file_name "main.cu" --orig_src_path_name "/home/jiaheng/gaohy/nvcc-simulate/main.cu" --allow_managed -arch compute_52 -m64 --no-version-ident -ftz=0 -prec_div=1 -prec_sqrt=1 -fmad=1 --include_file_name "main.fatbin.c" -tused --module_id_file_name "main.module_id" --gen_c_file_name "main.cudafe1.c" --stub_file_name "main.cudafe1.stub.c" --gen_device_file_name "main.cudafe1.gpu" "main.cpp1.ii" -o "main.ptx"
- PTX汇编成CUBIN
ptxas -arch=sm_52 -m64 "main.ptx" -o "main.sm_52.cubin"
- 生成Fatbin文件
fatbinary --create="main.fatbin" -64 --cicc-cmdline="-ftz=0 -prec_div=1 -prec_sqrt=1 -fmad=1 " "--image3=kind=elf,sm=52,file=main.sm_52.cubin" "--image3=kind=ptx,sm=52,file=main.ptx" --embedded-fatbin="main.fatbin.c"
生成 fatbinary 之后,如何把这个二进制数据和 host cpp 代码进行关联是个关键问题,CUDA 采用的方案是,把 fatbinary 二进制文件以十六进制字符串形式,通过内联汇编写入 fatbin.c 这一 c 文件中,并且在其上又建立了一个 stub.c 抽象层次,stub.c 加入到了 host code 的编译流程中。
Regarding the format of fatbin, please refer to this article.
- 编译CUDA代码生成对象文件
生成 main.o
gcc -D__CUDA_ARCH__=520 -D__CUDA_ARCH_LIST__=520 -c -x c++ -DCUDA_DOUBLE_MATH_FUNCTIONS "-I/home/jiaheng/dev/cuda-12.1/bin/../targets/x86_64-linux/include" -m64 "main.cudafe1.cpp" -o "main.o"
上面这条命令的核心内容就是 gcc -c main.cudafe1.cpp -o main.o。
从本质上来说,main.cudafe1.cpp 中是 include 了 fatbin.c 的内容,即通过它是可以看到 fatbinary 那些数据的。
其余内容就是 define 一些量
| |
这一步生成的 main.o 中是包含 nv_fatbin 这个 secton 的,因为 cudafe1.cpp 所 include 的 stub.c,或者说是最根源的fatbin.c 中,在内联汇编中是制定了 section 的,
| |
比较困惑的问题就是,嵌入了 fatbinary 形式 device code 的 host 端 可执行程序在执行时,是如何与 gpu 进行交互的。
对于这个问题,其实对于 cuda 本身的理解一直有点问题,其实 cuda 本身就是一个库,不过这个库相较于仅主机端的库的一个显著区别在于,它会涉及到一些同 GPU 硬件之间的关联。对于编程,编译,链接这一软件开发全流程,使用 cuda 库和使用其他库并没有什么本质区别,不过是使用 cuda 库的代码,由于涉及到的是异构,所以编译和链接上会有一点不同,但是本质都还是编译和链接。
cuda 编程同仅主机端编程最大的不同在于执行阶段,仅主机端代码在运行时,会把指令加载到内存,然后指定 PC 开始执行,但是这个执行模型显然是不适用于 GPU 的。根据 gpt 的说法,嵌在最终可执行程序中的 fatbinary 内容(ELF结构中的一个 section)是由 CUDA 运行时库负责扫描提取的,并且由 CUDA 运行时库将 device code 加载到 GPU 上。
下面结合编译流程主要说明以下几个问题:
- 何为PTX(Parallel Thread Execution) ,为何会设计它
- 何为SASS,为何会设计它
因为硬件在发展过程中,设计和架构可能会发生很大的改变,为了避免在硬件更新时软件发生较大的改变,一种常用的设计策略是抽象。即把真实的物理架构抽象为逻辑架构,开发者仅需要关注逻辑架构,从逻辑到物理的映射由框架开发商完成。
CUDA处理这个问题时采用的也是这种策略。“A CUDA application binary (with one or more GPU kernels) can contain the compiled GPU code in two forms, binary cubin objects and forward-compatible PTX assembly for each kernel. 4",或者说其将结构分为两种:
- 虚拟GPU结构(Virtual Architecture)
- 真实GPU结构(Real Architecture)
PTX实际就是Virtual Architecture的汇编产物,它是一种指令集,由于考虑的只是逻辑架构,因此它可以在不同物理架构的GPU上使用。而SASS则是对应的Real Architecture,它是实际运行在物理设备上的指令集。在实际编译过程中,它们分别对应着生成.ptx和.cubin两个文件的过程,简图如下所示。
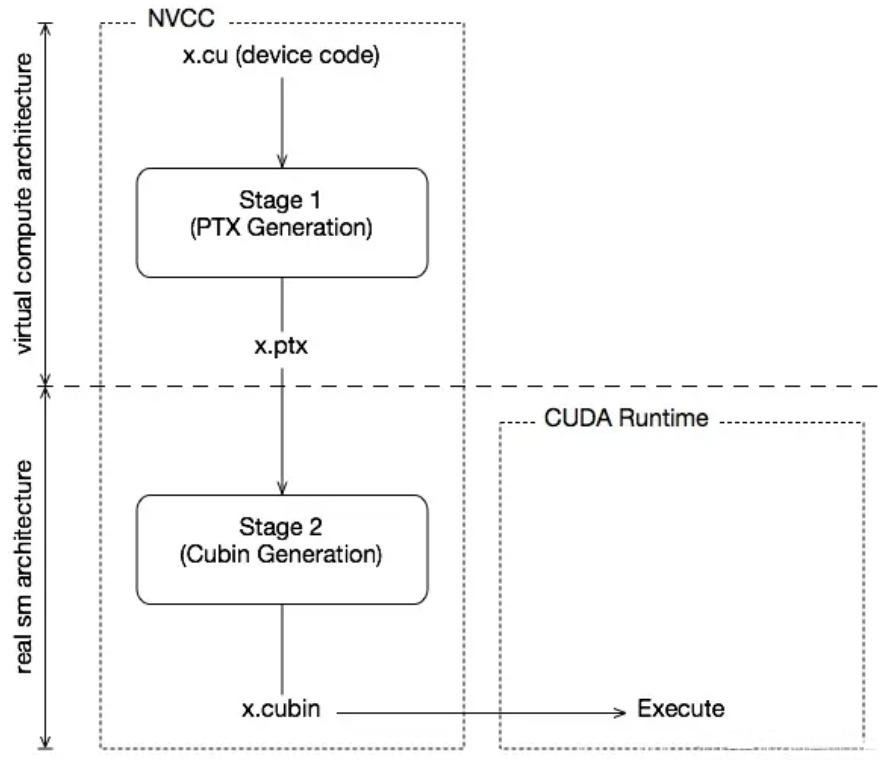
同时在编译时,也可以通过选项来指定不同的Virtual Architecture和Real Architecture。-arch=compute_52(-arch = --gpu-architecture)是指对虚拟GPU体系结构进行配置,生成相应的ptx。 -code=sm_52(-code = --gpu-code)是对实际结构进行配置。 一般要求 Virtual Architecture 的版本要低于 Real Architecture 的版本,即 arch < code, 这是对兼容性和执行性能的综合考量。 在程序实际执行时,如果执行平台与 code 所指定的平台相同,那么直接使用包裹中的可执行程序,从而获取到最佳性能;反之,还可以根据包裹中的 PTX 代码,通过 JIT 生成所在平台的 SASS 代码,进而获得向下兼容性。具体而言
A cubin generated for a certain compute capability is supported to run on any GPU with the same major revision and same or higher minor revision of compute capability. For example, a cubin generated for compute capability 8.0 is supported to run on a GPU with compute capability 8.6, however a cubin generated for compute capability 8.6 is not supported to run on a GPU with compute capability 8.0, and a cubin generated with compute capability 8.x is not supported to run on a GPU with compute capability 9.0. 4
Unlike cubin, PTX is forward-compatible. Meaning PTX is supported to run on any GPU with compute capability higher than the compute capability assumed for generation of that PTX. For example, PTX code generated for compute capability 8.x is supported to run on compute capability 8.x or any higher revision (major or minor), including compute capability 9.0.
| |
可以发现上述示例命令中的选项和描述并不对应,第2条指令使用-arch但是却指定了一个Real Architecture的版本。 当省略-code选项时,-arch选项指定的可以是Real Architecture的版本,此时由nvcc自行确定一个Virtual Architecture的合适版本 详见官方文档–gpu-architecture (-arch)和–gpu-code code (-code)
GPU Architecture and Compute Capability
关于 GPU Architecture 的发展,截止到 2022 年的情况可见下图,最新的架构可见官方文档

Reference
- [1] NVCC与PTX
[](As mentioned previously, multiple offloading images are bundled together by simply concatenating them in this format. Because we have the magic bytes and size of each image, we can extract them as-needed.) ↩︎